Replace WordPress Search with Own Algorithm

WordPress is great, no doubt about that. But it’s search functionality is certainly worth improving, or to put it differently — depending on the use case, it requires heavy customization. Example: You want to show search results of products, but you want to decide which products show up first – maybe because there are older and newer versions etc.

The key steps in implementing your own search algorithm are:

  1. Using the pre_get_posts hook to hook into WordPress’ wp_query
  2. Send query to own algorithm
  3. Put the result (post ID’s, that is) unto the “post__in” parameter of wp_query
  4. Run the query.

There are some things to be aware of, though:

1) WordPress re-orders the search results

This defeats one of the big advantages of using your own algorithm, but fortunately wp_query allows the following:

1
$wp_query->set( 'orderby', 'post__in');

That simple. The good point about that is that WP takes care of pagination, and when you change the search order on the frontend, it’s still working and re-ordering and paginating as expected. The drawback: The initial (customized) order of the results cannot be restored, unless the page is reloaded.

2) WordPress overwrites the search results

This is simple to fix as well — just empty the “s” parameter in the query.

3) Because the “s” parameter is empty, the search term doesn’t appear on the result page

This took a little bit of time to experiment, but eventually this is easy to fix as well: Just put the “s” parameter back in before the template redirect.


The code can then look like this:

1
2
3
4
5
6
7
8
9
10
11
12
13
14
15
16
17
18
19
20
21
22
23
24
25
26
27
28
29
30
31
32
33
34
35
36
37
38
39
40
 
add_action( 'pre_get_posts', 'my_pre_get_posts' );
add_action( 'template_redirect' , 'reset_search_query', 100 );
 
function my_pre_get_posts( ) {
        global $wp_query
 
        //only apply if in search 
        if ( $wp_query->is_search() ) {
             //you can set here whether the search replacement should happen in frontend or backend only
             //the below limits it to the frontend
	     if(!is_admin() && isset($_REQUEST['s'])) {
 
                //here you can send the search query to your own search function (not provided here)			
		$results = my_own_searchalgorithm($_REQUEST['s']);
                       //the result must be a simple array with post ids inside
		       if(isset($results)) {
				$wp_query->set( 'post__in', $results);
				$wp_query->set( 's', ''); //reset the search query - this is important
				$wp_query->set( 'orderby', 'post__in'); //keep order of own results
				$wp_query->set( 'post_type', 'product'); //set to desired post type
			} 
                      //if there are no results, wordpress falls back to it's own search
		}
	}
}
function reset_search_query() {
     // we are overwriting search results with our results, and therefore we need to empty the "s" parameter.
     // however, on the results page we need that "s" parameter to be active again - 
     // we can set this here, after the query and before the template reload
     if(!is_admin() && isset($_REQUEST['s'])) {
	   set_query_var('s', $_REQUEST['s']);
		}
}
 
function my_own_searchalgorithm($query) {
      $results = array();
      //include your own algorithm here and return an array with Post IDs, such as array(0 => 1717, 1 => 2874) etc.
      return $results;
}

Converting Japanese alphabets (Katakana & Hiragana) into Latin script

For a personal project, I needed to play around with Japanese alphabets (Hiragana and Katakana, that is). The project involved several simple tasks such as converting words written in Katakana or Hiragana to latin letters, finding strings written in Hiragana or Katakana and the conversion of voiced sounds into clear sounds. All solutions for these tasks are rather simple in PHP. Below is an approach to turn Japanese Hiragana and Katakana into Latin alphabet:

Converting words written in Katakana or Hiragana into Latin script

The goal is to translate ゴジラ into Gojira, とうきょう into Tōkyō and so on. This might look very easy since Japanese is a syllable language, but then we need to deal with small letters first, else きょう would be transcribed “kiyou” where it should be “kyō”. There is no function for this, so it’s necessary to put everything into an array.

You can test this function live here by pasting in Japanese text. As mentioned above, though, this function doesn’t handle Kanji (Chinese characters), so they won’t be changed. Also, as Japanese is written without spaces between words, the result is a large block of text.


1
2
3
4
5
6
7
8
9
10
11
12
13
14
15
16
17
18
19
20
21
22
23
24
25
26
27
28
29
30
31
32
33
34
35
<?php 
 
//the array covering all possible combinations. The transcription follows the Hepburn romanization system
 
 
mb_internal_encoding('UTF-8');
mb_regex_encoding('UTF-8');
 
$kana2roma = array('/きゃ/' => 'kya', '/きゅ/' => 'kyu', '/きょ/' => 'kyo', '/しゃ/' => 'sha', '/しゅ/' => 'shu', '/しょ/' => 'sho', '/ちゃ/' =>'cha', '/ちゅ/' => 'chu', '/ちょ/' => 'cho', '/にゃ/' => 'nya', '/にゅ/'=> 'nyu', '/にょ/' => 'nyo', '/ひゃ/' => 'hya', '/ひゅ/' => 'hyu', '/ひょ/' => 'hyo', '/みゃ/' => 'mya', '/みゅ/' => 'myu', '/みょ/' =>'myo', '/りゃ/' => 'rya', '/りゅ/' => 'ryu', '/りょ/' => 'ryo', '/ぎゃ/'=> 'gya', '/ぎゅ/' => 'gyu', '/ぎょ/' => 'gyo', '/じゃ/' => 'ja', '/じゅ/' => 'ju', '/じょ/' => 'jo', '/ぢゃ/' => 'ja', '/ぢゅ/' => 'ju', '/ぢょ/' => 'jo', '/びゃ/' => 'bya', '/びゅ/' => 'byu', '/びょ/' => 'byo', '/ぴゃ/' => 'pya', '/ぴゅ/' => 'pyu', '/ぴょ/' => 'pyo', '/あ/' => 'a', '/い/' => 'i', '/う/' => 'u', '/え/' => 'e', '/お/' => 'o', '/か/' =>'ka', '/き/' => 'ki', '/く/' => 'ku', '/け/' => 'ke', '/こ/' => 'ko', '/さ/' => 'sa', '/し/' => 'shi', '/す/' => 'su', '/せ/' => 'se', '/そ/' =>'so', '/た/' => 'ta', '/ち/' => 'chi', '/つ/' => 'tsu', '/て/' => 'te','/と/' => 'to', '/な/' => 'na', '/に/' => 'ni', '/ぬ/' => 'nu', '/ね/'=> 'ne', '/の/' => 'no', '/は/' => 'ha', '/ひ/' => 'hi', '/ふ/' => 'fu','/へ/' => 'he', '/ほ/' => 'ho', '/ま/' => 'ma', '/み/' => 'mi', '/む/'=> 'mu', '/め/' => 'me', '/も/' => 'mo', '/や/' => 'ya', '/ゆ/' => 'yu','/よ/' => 'yo', '/ら/' => 'ra', '/り/' => 'ri', '/る/' => 'ru', '/れ/'=> 're', '/ろ/' => 'ro', '/わ/' => 'wa', '/ゐ/' => 'wi', '/ゑ/' => 'we','/を/' => ' o ', '/ん/' => 'n ', '/が/' => 'ga', '/ぎ/' => 'gi', '/ぐ/' =>'gu', '/げ/' => 'ge', '/ご/' => 'go', '/ざ/' => 'za', '/じ/' => 'ji', '/ず/' => 'zu', '/ぜ/' => 'ze', '/ぞ/' => 'zo', '/だ/' => 'da', '/ぢ/' =>'ji', '/づ/' => 'zu', '/で/' => 'de', '/ど/' => 'do', '/ば/' => 'ba', '/び/' => 'bi', '/ぶ/' => 'bu', '/べ/' => 'be', '/ぼ/' => 'bo', '/ぱ/' =>'pa', '/ぴ/' => 'pi', '/ぷ/' => 'pu', '/ぺ/' => 'pe', '/ぽ/' => 'po','/aa/' => 'ā', '/o[ou]/' => 'ō', '/uu/'=> 'ū',"/・/" => '&middot;',"/(/" => ' (',"/)/" => ') ',"/、/" => ', ','/(っ)+([a-zA-Z]{1})/' => '$2$2',"/aー/" => "ā", "/iー/" => "ī", "/uー/" => "ū","/eー/" => "ē", "/oー/" => "ō", "/っ/" => "'");
 
 
//the function:
 
function kana2roma($str) {
		global $kana2roma;
 
		//turn Katakana into Hiragana so that we can transform them as well
		$str = mb_convert_kana($str,"KVHc","UTF-8");
 
		//convert the string
		$str = preg_replace(array_keys($kana2roma), array_values($kana2roma), $str);
 
		return $str;
}
 
 
// the string before the conversion:
 
$beforeString = "ドイツのビールはやっぱりおいしい";
 
$afterString = kana2roma($beforeString);
 
//output: doitsunobīruhayapparioishii
 
?>

Connect Filemaker with MySQL database using ODBC

Task: To use a remote MySQL database on FileMaker
The setup:

Client Side:
—————-
• FileMaker 12 Pro (though older versions can do this to)
• Mac OS Mountain Lion 10.7.5

Server Side:
—————-
Linux (Cent OS 6) – though this shouldn’t matter
MySQL 5.1.69 (this matters)
Server hosted on Amazon

The steps:

1. Preparing the server

1.1 Server port

First, you need to open a port specifically for this purpose.The common port (which means the least trouble and most security worries) is 3306. Since it’s so common, it’s a good idea to restrict usage of this port to a certain IP or IP range.

1.2 MySQL database

You will need to set permissions in your MySQL database to allow access from outside, since by default access is restricted to localhost. The fastest way to do so is to use phpMyAdmin, open the record for the database you would like to use for Filemaker in mysql.db, paste in the IP of the machine that hosts your Filemaker in the “host” field and save as a new record. Do the same in mysql.user.

First trap: Your MySQL setup might use the old password encryption, which will later make the ODBC connection fail. If the encrypted password in your mysql.user.Password field is only 16 characters long, this will be case.
In that case, paste in the clear, unencrypted password in the Password field and select PASSWORD from the Function dropdown.

Don’t forget to run flush privileges; once you’re done with this part.

Once you are done with it, and given that mysql is installed on the machine that hosts Filemaker, it would be a good idea to test whether your Mysql and the server are properly setup.
Just run

1
mysql -h YOURDOMAIN_OR_IP -u DATABASE_USERNAME DATABASE_NAME -p

in Terminal, type in your password (given that you get that far) and see whether you can log in. If you can’t, then there’s something wrong already, so you should first see if the port is really open, MySQL user permissions are set etc.

2. Preparing the client

2.1 Getting the ODBC Connector

You can download the necessary ODBC connector from Mysql: http://dev.mysql.com/downloads/connector/odbc/5.2.html

However, this is where things can go horribly wrong. If you chose the wrong architecture (32-bit vs. 64-bit), things won’t work, but at least you will get an error message telling you that the architecture is wrong. My iMac is from 2012 and required 32-bit.
The version can also mess things up – unfortunately that’s more difficult to trap (connection in Filemaker works but can’t access tables etc – lots of unrelated error messages). On Mountain Lion I tried the Connector 5.1 first and got plenty of problems. Choosing 5.2 solved these issues.
This is how the connector needs to be installed:

2.1.1 download and unpack in Finder.
2.1.2 open terminal, type “cd ”
2.1.3 drag the lib folder from Finder to terminal and press enter
2.1.4 type

1
2
3
4
5
	sudo mkdir /usr/local/
	sudo mkdir /usr/local/lib
	sudo cp * /usr/local/lib/
	cd ../bin
	sudo ./myodbc-installer -a -d -n "MySQL ODBC 5.2 Driver" -t "Driver=/usr/local/lib/libmyodbc5a.so"

(it doesn’t have to be /usr/local I assume, but it seems to be common to install it there, but this folder doesn’t exist by default on Mac). Be aware that you need to “sudo”, else it won’t work.
If successful, you should get a message saying something like:

Success: Usage count is 0

2.2 The ODBC Administrator

Until a few years ago, Mac OS shipped with an app called ODBC Administrator, residing in /Applications/Utilities, but it’s not included in the OS anymore since Lion. Or so.
However, the app can be downloaded here:

http://support.apple.com/kb/DL895

Installing the app is quick and easy – it will sit in the above-mentioned directory after that.

Some of the following lines are partially based on a comment by Marc Pope in this bug report. Kudos to Mark for this comment, which proved to be very helpful:

2.2.1 Launch the ODBC Administrator app and click the “Drivers” tab
2.2.2 Click the lock icon in the left bottom corner and type in your password
2.2.3 Click add, type in the description (everything will do) and the path and filename of the driver as set up in 2.1.4
2.2.4 You don’t need to specify a setup file – the system will do this for you
2.2.5 Set “Define as:” to System (else you can’t create System DSN’s, and Filemaker won’t accept anything else)
2.2.6 Click “OK” and “Apply”

2.3 Setting up a database source

2.3.1 In ODBC Administrator, click the “System DSN”
2.3.2 Choose the driver you’ve set up in 2.2 and click “OK”
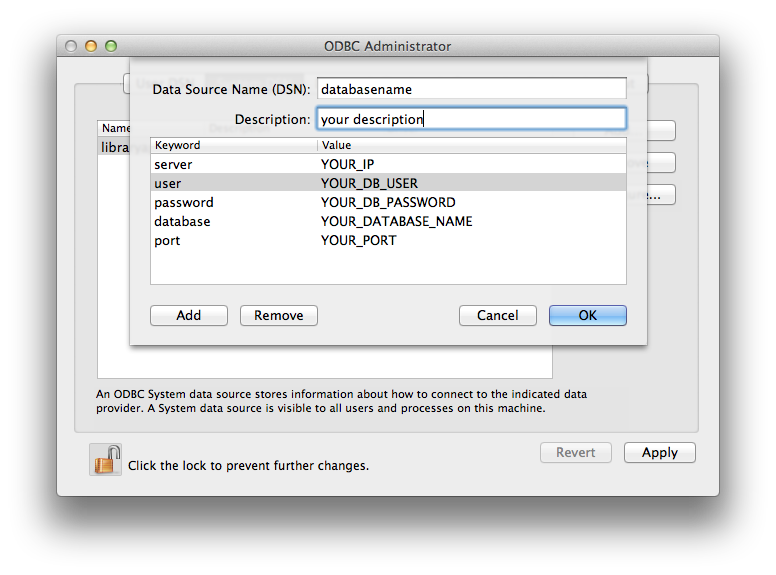
2.3.3 Fill in your details as followed:

odbc-admin-setupNote the following:

1) The data source name MUST be identical to the database name you want to connect to. However, the ODBC administrator only allows letters and numbers, but no underscore. If your database name contains underscores, type in a temporary name and go to 2.4 after completion
2) The UI is a bit sluggish – click on Keyword and wait a bit until it becomes editable – move ahead with tab to enter the value.

2.3.4 Save changes and exit

2.4 Fixing the underscore issue

If your MySQL database name contains underscores, you will have to do the following:
In Terminal, open the odbc.ini file that was created by the ODBC administrator, for example:

1
sudo vi /Library/ODBC/odbc.ini

and change the temporary name of your database (as typed in 2.3.3) to the proper name including the underscore. Note that there are 2 occurrences of the name (one of it in square brackets).

3. Filemaker

That was already to difficult part. The Filemaker part is straight forward and self explanatory.
One way to add the new datasource is to go to

Manage>Database>Relationships

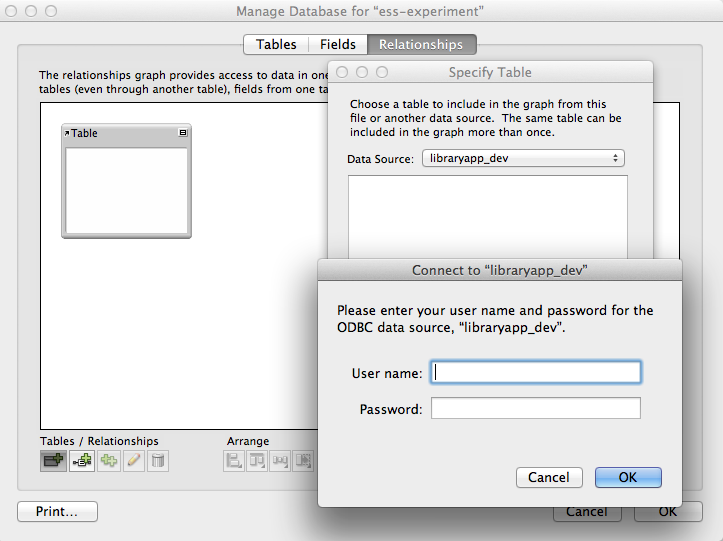
and click the “add table” button at the left bottom. In the popup menu “Data Source”, you can choose “Add ODBC data source…” and pick the source you have created in 2.3. You should get a list of your tables after confirming the DB username and password.

fm-add-database

Bottom line: I was surprised by how smooth external database sources can be handled by Filemaker. But the way to get there is rather complicated, and really started to wonder, why Filemaker for example can’t include an easier method to enable ODBC connections. Instead, it’s wading through dozens of bug reports and cries for help to get there (it almost took me 3 hours to get where I wanted to get, but I guess it should only take 30 minutes or so if I had to repeat it. Given that the environment is the same.

HTML comments and CDN

The functionality of HTML comments is self-explanatory: Comments should carry <!– comments  –>,i.e. contents that should be hidden from visitors (though this contents should of course not contain any type of sensitive information since it can be accessed very easily by looking at the source code) OR contents you’d like to hide temporarily. The latter, however, already defies the main purpose of HTML comments.

HTML comments however could also be used to trigger certain behaviour in Javascript. For example, by sending a request to another script using Ajax and hiding certain triggers in HTML comments. Your script might require the following:

• Response consists of HTML code with varying contents, depending on the parameters sent to the script
• Processing of the response not only includes displaying the contents that was returned by the script but maybe also more, depending on what was sent back (but you might not know what exactly will be returned if it’s dynamic contents)

One easy fix to deal with this requirement can be the usage of comments, for example by including <!– FAILED –> or <!– SUCCESS –> in the response. The script can then check whether FAILED or SUCCESS exists in the code and process differently based on the outcome. Very simple and effective and more or less foool-proof. Or so you might think, until you move your website to a CDN, such as CloudFlare: Some CDN will “optimize” your code to reduce unnecessary page load. This can (and in the case of CloudFlare for example definitely does) include the removal of ALL HTML comments in your code: And so, your script could stop working all of a sudden since process-deciding parameters have disappeared.

Lesson learnt: Use HTML comments for comments only – because they can disappear. Instead, use other techniques such as <div style=”display: none;”>FAILED</div> to “hide” system-relevant data.

Move mysql data directory to new location

In theory, it’s very easy:
In linux distributions, you first stop mysql:

service mysqld stop

Then, copy the entire data to the new location. Use -rv to make sure permissions etc. are copied as well:

cp -rv /var/lib/mysql /home

Next, make user mysql the owner:

chown -R mysql:mysql /home/mysql

Next, open the config file /etc/my.cnf
and change the datadir accordingly:

datadir=/home
#datadir=/var/lib/mysql

Last but not least, start mysql:

service mysqld start

In practice, this can go wrong easily, and there might be various reasons for this, such as apparmor. However, before starting lengthy researches, try the following instead:

mkdir /home/db
cd /home/db
mysql_install_db
service mysqld stop
cp -rv /var/lib/mysql /home/db
chown -R mysql:mysql /home/db/mysql
vi /etc/my.cnf
[mysqld]
datadir=/home/db/mysql
#datadir=/var/lib/mysql
service mysqld start

Check your website.

In my case, this solved the issue of error messages such as “Can’t open the mysql.plugin table. Please run mysql_upgrade to create it” (which wasn’t possible since mysql_upgrade only runs when the new datadir is ok).

Speeding up app search on iTunes Connect

We have some 100 apps in the iTunes store, and sometimes we run campaigns, making a couple of apps cheaper then usual, but only for a limited period of time.
It would be nice if it was possible to batch-update metadata like price tier and campaign period information based on the AppID – but that’s wishful thinking. Some research revealed – nothing has changed. Actually, it is possible to batch-change price and other information through Apple’s Application loader or through the command-line transporter, but only for in-App purchases and not for apps.

It still has to be manual, it seems. So with more than 100 apps, how do we proceed. After clicking “Manage Your Applications” in iTunes Connects, there is a search mask. The most important field is the “Name” of course, with a drop-down menu in front of it and the default set to “Starts with”. So the procedure was always

1. Change dropdown to “Contains”
2. Type in search term that, according to memory is in the app name
3. Select app that comes up in auto fill OR click search

always wondering why the dropdown’s default is “Starts with”. As a matter of fact, I doubt that a lot of developers use the other options (ends with, is not, equal to). Why not get rid of it?

However, right now I’ve noticed that step 1 can be skipped, because the auto-fill seems to ignore the search specifier. So the faster process now is:

1. Type in search term that appears somewhere in the title
2. Choose right app name in auto-fill using cursor keys (nothing else) and press enter

itc-searchmask

and that’s it. Saves a few seconds per app only, but if you have to update dozens of apps quickly it speeds things up.

Sniffing iOS apps traffic

Recently, I wanted to find out how other developers deal with subscription related issues on Apple’s Newsstand for iPhone/iPad, i.e. whether and if yes how developers use Urban Airship or other solutions.
I couldn’t find a useful app that can do what I wanted to do: To find out what conversation is going on between the app and the server. I ended up with the following setup:

• Pair iPad/iPhone with Mac (or Windows) via Bluetooth
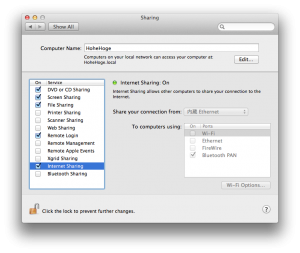
• Share Internet connection (on Mac: Share LAN or WiFi on Bluetooth – see screenshot):

Settings for sharing internet on bluetooth

Settings for sharing internet on bluetooth

• Install Wireshark on Mac
• Log traffic using Wireshark while using the Newsstand app.

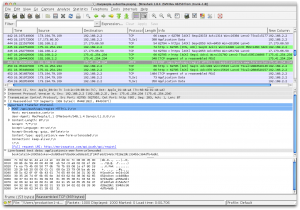
Below is a screenshot of what has been captured from the iPad Newsstand app:

Wireshark protocol example

Wireshark protocol example

Downside: If you connect your device to the internet via Bluetooth and a shared internet connection, iOS won’t allow to download new issues or connect to the AppStore. I.e. you’ll have to sniff WiFi traffic and connect via Wifi (or find an app that can monitor all outgoing traffic on your apple device) to log this part of the conversation. As far as I know, a jail-broken iThing can override the “WiFi only” limitation, but I haven’t tried it myself.

The above way to capture network traffic from iPhones/iPads should also be a warning to iOS developers using their own servers to communicate with the app: It is quite easy to see where the app is connecting too, so the server side should better be ready for dealing with unauthorized access.

Multiple SSL-secured domains on one IP

(partially taken from this manual: http://blog.hououji.info/archives/190)

1
2
3
4
5
6
7
8
9
10
11
12
13
14
15
16
17
18
19
yum install gcc zlib-devel
yum install mod_perl-devel
wget http://www.openssl.org/source/openssl-1.0.0g.tar.gz
gunzip < openssl-1.0.0g.tar.gz | tar xvf -
cd openssl-1.0.0g
./config --prefix=/usr/local2 --openssldir=/usr/local2/openssl enable-tlsext shared
make
make install
cd ..
wget http://ftp.cuhk.edu.hk/pub/packages/apache.org//httpd/httpd-2.2.31.tar.gz
gunzip < httpd-2.2.31.tar.gz | tar xvf -
cd httpd-2.2.31
LDFLAGS=-L/usr/local2/lib CPPFLAGS=-I/usr/local2/include/ ./configure -prefix=/usr/local2/apache-2.2.23 -with-included-apr -with-mpm=worker -enable-mime-magic -enable-so -enable-vhost-alias -enable-ssl -enable-rewrite -with-java-home=/usr/java/jdk1.6.0_14 -enable-unique-id -enable-deflate -enable-proxy -enable-proxy-ajp -enable-expires -disable-status -disable-cgid -disable-userdir -with-ssl=/usr/local2/ -enable-mods-shared="isapi file_cache cache disk_cache mem_cache ext_filter expires headers usertrack unique_id status info cgi cgid speling ssl"
make
make install
cd /usr/lib/httpd/modules
ln -s /usr/local2/apache-2.2.31/modules/mod_ssl.so /usr/lib/httpd/modules
ln -s /usr/local2/lib/libssl.so.1.0.0 /lib/libssl.so.1.0.0
ln -s /usr/local2/lib/libcrypto.so.1.0.0 /lib/libcrypto.so.1.0.0

Import b2evolution blog to wordpress

A few months ago I decided that it’s time to say goodbye to b2evolution. I liked the platform, and I’ve been using it for almost 5 years, but development seemed to have stalled, and while I compensated the stillstand for a while by developing my own tools, I grew tired of the fact that everything I wanted is just a click away in WordPress.

All I had to do now was to find a way to feed my b2evolution data into the WordPress scheme. It took a good while until I found someone with a similar task who was willing to share. And to my shame, I have to admit that I don’t know anymore where I got the script from. It proved to be broken anyway, probably because it wasn’t up to date. So I based my importing script on that script, and it worked well. Needless to say that there’s no guarantee that this will still work. And you should (in any case) be sure that you have backed up everything.

What you will need for this setup:

1. A running b2evolution installation
2. A running WordPress installation
3. WordPress Counterize Plugin
4. Database access parameters (see first 20 lines in script)

The script could look nicer, but I wanted to limit it to just one file, so this is what I came up with (again, based on someone else’s work):

1
2
3
4
5
6
7
8
9
10
11
12
13
14
15
16
17
18
19
20
21
22
23
24
25
26
27
28
29
30
31
32
33
34
35
36
37
38
39
40
41
42
43
44
45
46
47
48
49
50
51
52
53
54
55
56
57
58
59
60
61
62
63
64
65
66
67
68
69
70
71
72
73
74
75
76
77
78
79
80
81
82
83
84
85
86
87
88
89
90
91
92
93
94
95
96
97
98
99
100
101
102
103
104
105
106
107
108
109
110
111
112
113
114
115
116
117
118
119
120
121
122
123
124
125
126
127
128
129
130
131
132
133
134
135
136
137
138
139
140
141
142
143
144
145
146
147
148
149
150
151
152
153
154
155
156
157
158
159
160
161
162
163
164
165
166
167
168
169
170
171
172
173
174
175
176
177
178
179
180
181
182
183
184
185
186
187
188
189
190
191
192
193
194
195
196
197
198
199
200
201
202
203
204
205
206
207
208
209
210
211
212
213
214
215
216
217
218
219
220
<?php
#variables that require your attention: b2evolution

$b2_db = 'B2EVOLUTION_DATABASE';
$b2_usr = 'B2EVOLUTION_DATABASE_USER';
$b2_pwd = 'B2EVOLUTION_DATABASE_PASSWORD';
$b2_host = 'localhost';	//usually ok as is
$b2_blog = 'B2EVOLUTION_BLOG_NUMBER';
$b2_startfrom = '1'; // put in number from your first proper blog entry
$b2_oldimagepath = 'path/to/image/folder';	//ignore if images and other media files will stay in same directory
$b2_newimagepath = 'path/to/image/folder';	//ignore if images and other media files will stay in same directory
 
#variables that require your attention: wordpress

$wp_db = 'WORDPRESS_DATABASE';
$wp_usr = 'WORDPRESS_DATABASE_USER';
$wp_pwd = 'WORDPRESS_DATABASE_PASSWORD';
$wp_host = 'localhost';	//usually ok as is
$wp_path = '/path/to/wp/'; //don't forget first and trailing slash
$wp_pref = 'wp_'; //set when installing Wordpress. Default is wp_ - change if you aren't using the default


// connect to the b2evo database
$resB2 = mysql_connect($b2_host,$b2_usr,$b2_pwd);
if (!$resB2) {
	exit("Connection failed! host: $b2_host, user: $b2_usr, pass: $b2_pwd");
}
if (!mysql_select_db($b2_db,$resB2)) {
	exit("Couldn't select database: $b2_db");
}            
// connect to the WP database
$resWP = mysql_connect($wp_host,$wp_usr,$wp_pwd,TRUE);
if (!$resWP) {
	exit("Connection failed! host: $wp_host, user: $wp_usr, pass: $wp_pwd");
}
if (!mysql_select_db($wp_db,$resWP)) {
	exit("Couldn't select database: $wp_db");
}
 
 
$arUser = array();
$arCat = array();
$arUser[1] = 1;
 
// get authors for blog
echo "Importing User records ... <BR />";
$sql = "SELECT DISTINCT evo_users.* 
		FROM evo_users, evo_posts 
		WHERE evo_users.user_ID=post_creator_user_ID 
		AND user_login<>'admin'";
$result = mysql_query($sql,$resB2) or die("Invalid query: " . mysql_error() . "<BR /> SQL : " . $sql);
if ($result) {
	$cnt = 0;
	while ($row = mysql_fetch_array($result, MYSQL_ASSOC)) {
		$sql = trim(str_replace("\n","","INSERT INTO `". $wp_pref ."users` ".
			"(`user_login`,`user_pass`,`user_firstname`,`user_lastname`,`user_nickname`,`user_icq`," .
			"`user_email`,`user_url`,`user_ip`,`user_domain`,`user_browser`,`dateYMDhour`,`user_level`," .
			"`user_aim`,`user_msn`,`user_yim`,`user_idmode`)" .
			" VALUES ('".$row['user_login']."','".$row['user_pass']."','".$row['user_firstname']."','".$row['user_lastname']."','".$row['user_nickname']."','".$row['user_icq']."','" .
			$row['user_email']."','".$row['user_url']."','".$row['user_ip']."','".$row['user_domain']."','".$row['user_browser']."','".$row['dateYMDhour']."','".$row['user_level']."','".
			$row['user_aim']."','".$row['user_msn']."','".$row['user_yim']."','".$row['user_idmode']."');"));
		$q = mysql_query($sql, $resWP) or die("Invalid query: " . mysql_error() . "<BR /> SQL : " . $sql);
		$id = mysql_insert_id($resWP);
		$arUser[$row['ID']] = $id;
		$cnt = $cnt + 1;
	}
	echo $cnt . " User record(s) imported! <BR />";
} else {
	echo "No User records found!<BR />";
}
 
 
// get categories
echo "Importing Category records ... <BR />";
$sql = "SELECT * FROM evo_categories";
$result = mysql_query($sql,$resB2) or die("Invalid query: " . mysql_error() . "<BR /> SQL : " . $sql);
if ($result) {
	$cnt = 0;
	while ($row = mysql_fetch_array($result, MYSQL_ASSOC)) {
		$sql = trim(str_replace("\n","","INSERT INTO `". $wp_pref ."categories` ".
			"(`cat_name`,`category_nicename`,`category_description`)" .
			" VALUES ('". mysql_escape_string($row['cat_name']) ."','".mysql_escape_string($row['cat_description'])."','".mysql_escape_string($row['cat_longdesc'])."');"));
		$q = mysql_query($sql, $resWP) or die("Invalid query: " . mysql_error() . "<BR /> SQL : " . $sql);
		$id = mysql_insert_id($resWP);
		$arCat[$row['cat_ID']] = $id;
		$cnt = $cnt + 1;
	}
	echo $cnt . " Category record(s) imported! <BR />";
} else {
	echo "No Category records found!<BR />";
}
 
 
// get entries for blog
echo "Importing Entry records ... <BR />";
$sql = "SELECT * 
		FROM evo_posts 
		WHERE post_ID>".$b2_startfrom;
$result = mysql_query($sql,$resB2) or die("Invalid query: " . mysql_error() . "<BR /> SQL : " . $sql);
if ($result) {
	$cnt = 0;
	$cntCom = 0;
	$cntCat = 0;
	while ($row = mysql_fetch_array($result, MYSQL_ASSOC)) {
		// author ID must be switched to new author ID
		$aid = $arUser[$row['post_author']];
		// category ID must be switched to new category ID
		$cid = $arCat[$row['post_category']];
		if (!$cid) {
			$cid = '1';
		}
 
		//change date to GMT:
		$posttime = strtotime($row['post_datestart']);
		$gwmt = $posttime-(9*60*60);
		$gwmtimestring = date("Y-m-d H:i:s",$gwmt);
 
		//change path for images
		$row['post_content'] = $b2_newimagepath!=$b2_oldimagepath ? str_replace($b2_oldimagepath,$b2_newimagepath,$row['post_content']) : $row['post_content'];
 
		$sql = trim(str_replace("\n","","INSERT INTO `". $wp_pref ."posts` ".
			"(post_author,post_date,post_modified,post_date_gmt,post_modified_gmt,post_content,post_title,post_name)" .
			" VALUES ('1','".$row['post_datestart']."','".$row['post_datestart']."','".$gwmtimestring."','".$gwmtimestring."','".mysql_escape_string($row['post_content'])."','".mysql_escape_string($row['post_title'])."','" .mysql_escape_string($row['post_urltitle'])."');"));
		$q = mysql_query($sql, $resWP) or die("Invalid query: " . mysql_error() . "<BR /> SQL : " . $sql);
		$id = mysql_insert_id($resWP);
 
		//lets add the page views, given that we have "Counterize Pages" installed...
		$formattime = explode(" ",$row['post_datecreated']);
		$formattime2 = explode("-",$formattime[0]);
		$urlforwp = $wp_path.$formattime2[0]."/".$formattime2[1]."/".$formattime2[2]."/".$row['post_urltitle']."/";
		$sql = "INSERT INTO ".$wp_pref."Counterize_Pages (url,count,postID) VALUES 
						('".$urlforwp ."','".$row['post_views']."','".$id."');";
		$q = @mysql_query($sql, $resWP);
		//page views add end
 
 
		$eid = $row['post_ID'];
		$cnt = $cnt + 1;
		// get comments for entry
		$sql = "SELECT * 
				FROM evo_comments WHERE comment_post_ID='" . $eid."'";
		$res = mysql_query($sql, $resB2) or die("Invalid query: " . mysql_error() . "<BR /> SQL : " . $sql);
 
		echo "$sql <br />";
 
		if ($res) {
			while ($row = mysql_fetch_array($res, MYSQL_ASSOC)) {
				$sql = trim(str_replace("\n","","INSERT INTO `". $wp_pref ."comments` ".
					"(`comment_post_ID`,`comment_author`,`comment_author_email`," .
					"`comment_author_url`,`comment_author_IP`,`comment_date`," .
					"`comment_content`,`comment_karma`)" .
					" VALUES ('".$id."','" . mysql_escape_string($row['comment_author']) . "','" . mysql_escape_string($row['comment_author_email']) .
					"','" . mysql_escape_string($row['comment_author_url']) . "','" . $row['comment_author_IP'] . "','" . $row['comment_date'] .
					"','" . mysql_escape_string($row['comment_content'])."','". $row['comment_karma'] ."');"));
				$q = mysql_query($sql, $resWP) or die("Invalid query: " . mysql_error() . "<BR /> SQL : " . $sql);
				$cntCom = $cntCom + 1;
			}
		}
		// get categories for entry
 
		$cntTmp = 0;
		$sql = "SELECT * FROM evo_postcats WHERE postcat_post_ID=" . $eid;
		$res = mysql_query($sql, $resB2) or die("Invalid query: " . mysql_error() . "<BR /> SQL : " . $sql);
		if ($res) {
			while ($row = mysql_fetch_array($res, MYSQL_ASSOC)) {
				$cid = $arCat[$row['postcat_cat_ID']];
				$sql = trim(str_replace("\n","","INSERT INTO `". $wp_pref ."post2cat` ".
					"(`post_id`,`category_id`)" .
					" VALUES ('" . $id . "','" . $cid . "');"));
				$q = mysql_query($sql, $resWP) or die("Invalid query: " . mysql_error() . "<BR /> SQL : " . $sql);
				$cntCat = $cntCat + 1;
				$cntTmp = $cntTmp + 1;
			}
		}
		if ($cntTmp == 0) {
			// No categories defined in b2evo - put it in the default category
			$sql = trim(str_replace("\n","","INSERT INTO `". $wp_pref ."post2cat` ".
				"(`post_id`,`category_id`)" .
				" VALUES ('" . $id . "','1');"));
			$q = mysql_query($sql, $resWP) or die("Invalid query: " . mysql_error() . "<BR /> SQL : " . $sql);
			$cntCat = $cntCat + 1;
		}
	}
 
 
	//now put up comments count
$sql = "SELECT ID FROM ".$wp_pref."posts";
$result = mysql_query($sql, $resWP);
 
 if ($result) {
	while ($row = mysql_fetch_array($result, MYSQL_ASSOC)) {
		$sql2 = "SELECT COUNT(*) 
				 FROM ".$wp_pref."comments 
				 WHERE comment_post_ID = '".$row['ID']."' 
				 AND comment_approved = '1'";
		$result2 = mysql_query($sql2, $resWP);
		$row2 = mysql_fetch_row($result2);
		echo $row2[0];
 
		if($row2[0]>0) {
			$sql3 = "UPDATE ".$wp_pref."posts 
					 SET comment_count='".$row2[0]."' 
					 WHERE ID='".$row['ID']."'";
			$result3 = mysql_query($sql3, $resWP);
				}
 
		}
 }
 
	echo $cnt . " Entry record(s) imported! <BR />";
	echo "&nbsp;&nbsp;&nbsp;&nbsp;&nbsp;" . $cntCom . "Comment record(s) imported! <BR />";
	echo "&nbsp;&nbsp;&nbsp;&nbsp;&nbsp;" . $cntCat . "Entry Category record(s) imported! <BR />";
} else {
	echo "No Entry records found!<BR />";
}
mysql_close($resB2);
mysql_close($resWP);
echo "Finished";
?>

Custom Function for Filemaker: Find Matches in 2 value lists

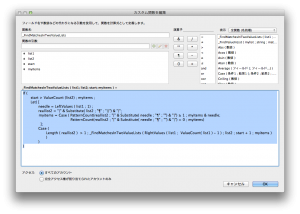
In a Filemaker database, I had to come up with a quick way to find out which values in array myitems also exist in array list1 and array list2. For this, I created the following function:

_FindMatchesInTwoValueLists(list1,list2,start,myitems)

This is the function – as you can see, it’s recursive. The variable “start” is usually 0 when the function is initially called. start will then be incremented until the end of the array is reached. In this example, array list2 should be the larger array – else you will have to adjust the function.

1
2
3
4
5
6
7
8
9
10
11
12
13
14
15
16
If (
  start > ValueCount (list2) ; myitems ;
   Let( [
      needle = LeftValues ( list1 ; 1) ;
      reallist2 = "|" & Substitute( list2 ; "¶" ; "||") & "|";
      myitems = Case ( 
              PatternCount(reallist2 ; "|" & Substitute( needle ; "¶" ; "") & "|")  1 ; 
                myitems & needle;
                   PatternCount(reallist2 ; "|" & Substitute( needle ; "¶" ; "") & "|") = 0 ; 
                     myitems)
          ];
	Case (
	   Length ( reallist2 )  > 1 ; _FindMatchesInTwoValueLists ( RightValues ( list1 ;  ValueCount( list1 ) - 1 ) ; list2 ; start + 1 ; myitems )
             )
        )
)

and the settings in the custom function editor:

filemaker-custom-function